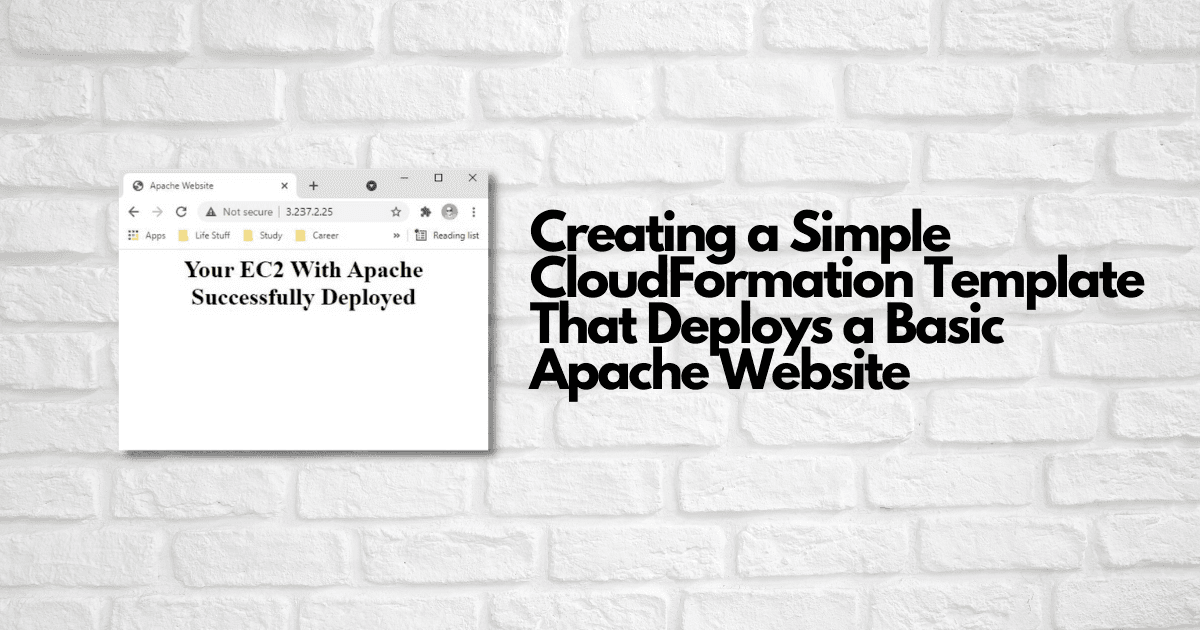
Creating a Simple CloudFormation Template That Deploys a Basic Apache Website
Overview
CloudFomation makes it easy to deploy infrastructure as code. It allows us to create a template containing logical resources and deploy it as a "stack" in 1 step. This is faster, repeatable and more consistent than deploying resources manually in AWS.
This is a simple portable CloudFormation template (YAML) that deploys a basic Apache website on an EC2 instance. This article breaks down the code and shows you how to deploy the template in CloudFormation.
Before we take a deep dive, take a look at the full code snippet here:
Full CloudFomation Template (YAML)
Parameters:
  LatestAmiId:
    Description: "AMI for EC2"
    Type: 'AWS::SSM::Parameter::Value<AWS::EC2::Image::Id>'
    Default: '/aws/service/ami-amazon-linux-latest/amzn2-ami-hvm-x86_64-gp2'
  SubnetId:
    Description: "Subnet ID"
    Type: 'AWS::EC2::Subnet::Id'
  KeyName:
    Type: "AWS::EC2::KeyPair::KeyName"
    Description: "Key Pair for EC2"
  UserDataMessage:
    Description: "Message for HTML page"
    Default: "Your EC2 With Apache Successfully Deployed"
    Type: "String"
Resources:
  InstanceSecurityGroup:
    Type: 'AWS::EC2::SecurityGroup'
    Properties:
      GroupDescription: Enable SSH and HTTP access via port 22 IPv4 & port 80 IPv4
      SecurityGroupIngress:
        - Description: 'Allow SSH IPv4 IN'
          IpProtocol: tcp
          FromPort: '22'
          ToPort: '22'
          CidrIp: '0.0.0.0/0'
        - Description: 'Allow HTTP IPv4 IN'
          IpProtocol: tcp
          FromPort: '80'
          ToPort: '80'
          CidrIp: '0.0.0.0/0'
  Instance:
    Type: 'AWS::EC2::Instance'
    Properties:
      InstanceType: "t2.micro"
      ImageId: !Ref "LatestAmiId"
      SubnetId: !Ref "SubnetId"
      SecurityGroupIds:
        - !GetAtt InstanceSecurityGroup.GroupId
      KeyName: !Ref "KeyName"
      Tags:
        - Key: Name
          Value: Base-Config-Apache-Instance
      UserData:
        Fn::Base64: !Sub |
          #!/bin/bash -xe
          yum -y update
          yum -y upgrade
          yum install -y httpd
          systemctl enable httpd
          systemctl start httpd
          echo "<html><head><title>Apache Website</title></head><body><h1><center>${UserDataMessage}</center></h1></body></html>" > /var/www/html/index.html

Outputs:
  PublicIp:
    Description: Server Public IP
    Value: !GetAtt Instance.PublicIp
    Export:
      Name: !Sub "${AWS::StackName}-PublicIp"
  PublicDnsName:
    Description: Server Public DNS Name
    Value: !GetAtt Instance.PublicDnsName
    Export:
      Name: !Sub "${AWS::StackName}-PublicDnsName"
  PrivateIp:
    Description: Server Private IP
    Value: !GetAtt Instance.PrivateIp
    Export:
      Name: !Sub "${AWS::StackName}-PrivateIp"
  AvailabilityZone:
    Description: Server Availability Zone
    Value: !GetAtt Instance.AvailabilityZone
    Export:
      Name: !Sub "${AWS::StackName}-AvailabilityZone"
Parameters
The first part of this template specifies the Parameters. Parameters enable you to input custom values to your template each time you create or update a stack.
Resources specified later in the template reference these values and use the data.
Parameters:
LatestAmiId:
    Description: "AMI for EC2"
    Type: 'AWS::SSM::Parameter::Value<AWS::EC2::Image::Id>'
    Default: '/aws/service/ami-amazon-linux-latest/amzn2-ami-hvm-x86_64-gp2'
  SubnetId:
    Description: "Subnet ID"
    Type: 'AWS::EC2::Subnet::Id'
  KeyName:
    Type: "AWS::EC2::KeyPair::KeyName"
    Description: "Key Pair for EC2"
  UserDataMessage:
    Description: "Message for HTML page"
    Default: "Your EC2 With Apache Successfully Deployed"
    Type: "String"
LatestAmiId: The "LatestAmiId" parameter we set specifies the AMI that the EC2 instance will use. If you look at the "type" field you'll notice that we are using the public SSM parameter store to specify the AMI. This is a much more flexible option and we also have the ability to change that value when we create our stack.
SubnetId: The "SubnetId" parameter we set allows us to choose a subnet from our current list of available subnets in our account. This is used later in the template when we define our EC2 logical resource.
KeyName: The "KeyName" parameter we set allows us to chose an EC2 key pair from the available key pairs in our account
UserDataMessage: The "UserDataMessage" parameter we set is a simple custom string that will be used later by the EC2 instance resource
Resources
The next section in our template is the "Resources" section. Unlike the Parameters and Output section, the resources section is required. In the resources, we define the logical resources that we want to deploy with our stack.
Resources:
InstanceSecurityGroup:
    Type: 'AWS::EC2::SecurityGroup'
    Properties:
      GroupDescription: Enable SSH and HTTP access via port 22 IPv4 & port 80 IPv4
      SecurityGroupIngress:
        - Description: 'Allow SSH IPv4 IN'
          IpProtocol: tcp
          FromPort: '22'
          ToPort: '22'
          CidrIp: '0.0.0.0/0'
        - Description: 'Allow HTTP IPv4 IN'
          IpProtocol: tcp
          FromPort: '80'
          ToPort: '80'
          CidrIp: '0.0.0.0/0'
The first resource we define in this template is "InstanceSecurityGroup". "InstanceSecurityGroup" is the logical ID.
Type: In the type section we define the kind of resource we want to deploy. In our case, we set this to "AWS::EC2::SecurityGroup". "AWS::EC2::SecurityGroup" means we are defining a security group. We will use this security group later when we define our EC2 instance.
Properties: The properties section allows us to define the settings for our security group. To see what properties we can set, we can review the AWS documentation for "AWS::EC2::SecurityGroup".
SecurityGroupIngress: One of the properties we set is "SecurityGroupIngress". This property allows us to set the inbound rules for the security group. In our case, we are allowing port 22 for SSH (from all networks '0.0.0.0/0') so we can manage the instance. We also allow port 80/HTTP (from all networks '0.0.0.0/0') so we can access the apache site. You'll notice that we don't have any outbound rules. This is because security groups are stateful. If you send a request to the instance, the response traffic for that request is allowed to flow out regardless of the outbound security group rules.
Instance:
    Type: 'AWS::EC2::Instance'
    Properties:
      InstanceType: "t2.micro"
      ImageId: !Ref "LatestAmiId"
      SubnetId: !Ref "SubnetId"
      SecurityGroupIds:
        - !GetAtt InstanceSecurityGroup.GroupId
      KeyName: !Ref "KeyName"
      Tags:
        - Key: Name
          Value: Base-Config-Apache-Instance
      UserData:
        Fn::Base64: !Sub |
          #!/bin/bash -xe
          yum -y update
          yum -y upgrade
          yum install -y httpd
          systemctl enable httpd
          systemctl start httpd
          echo "<html><head><title>Apache Website</title></head><body><h1><center>${UserDataMessage}</center></h1></body></html>" > /var/www/html/index.html
The second and last resource we define in this template is "Instance". Just like with the first resource "Instance" is just the logical ID of the resource.
Type: For this resource we have defined that we want to create an EC2 instance. We defined this by setting the type as 'AWS::EC2::Instance'
Properties: We defined several properties (or "settings") for this resource. The available properties can be referenced in the AWS documentation. Let's review them...
InstanceType: We hard-coded this value to use the "t2.micro" instance type.
ImageId: The "ImageId" specifies what AMI we want to use with our EC2 instance. We used the !Ref intrinsic function to reference the value we set in our "LatestAmiId" parameter.
SubnetId: The "SubnetId" specifies what subnet we want our EC2 instance to deploy to. We used the !Ref intrinsic function to reference our "SubnetId" parameter that we set. The "SubnetId" parameter lets us choose an available subnet in our account.
SecurityGroupIds: The "SecurityGroupIds" value specifies what security group we want to use with our EC2 instance. We used the !GetAtt intrinsic function to reference the security group ID of the group that we defined in our template.
KeyName: The "KeyName" value specifies what SSH keypair we want to use with our instance. We used the !Ref intrinsic function to get the value specified in the "KeyName" parameter.
Tags: Tags allow us to add key/value identifiers to resources. We specified a tag for our EC2 instance.
UserData: UserData allows us to bootstrap our EC2 instance. It allows us to run commands on the instance when it is first created. In our case, we ran a few commands to install apache on our Linux instance. If you look we also ran a command to create an HTML file that apache will use. That command also references our "UserDataMessage" parameter.
Outputs
The Outputs section of the template declares output values that you can import into other stacks. You can also view these values from the CloudFormation console.
As an example, if you were making a nested stack with a VPC you may want to export the VPC ID to another stack for later use.
Outputs:
PublicIp:
    Description: Server Public IP
    Value: !GetAtt Instance.PublicIp
    Export:
      Name: !Sub "${AWS::StackName}-PublicIp"
  PublicDnsName:
    Description: Server Public DNS Name
    Value: !GetAtt Instance.PublicDnsName
    Export:
      Name: !Sub "${AWS::StackName}-PublicDnsName"
  PrivateIp:
    Description: Server Private IP
    Value: !GetAtt Instance.PrivateIp
    Export:
      Name: !Sub "${AWS::StackName}-PrivateIp"
  AvailabilityZone:
    Description: Server Availability Zone
    Value: !GetAtt Instance.AvailabilityZone
    Export:
      Name: !Sub "${AWS::StackName}-AvailabilityZone"
In our case, we defined 4 outputs. We pulled these values from the EC2 instance we defined. You can reference the available outputs for EC2 in the AWS documentation.
Deploying the template
CloudFormation accepts YAML and JSON files. Our specific template is written in YAML. If we save the template as a .yaml file we can deploy it to CloudFormation.
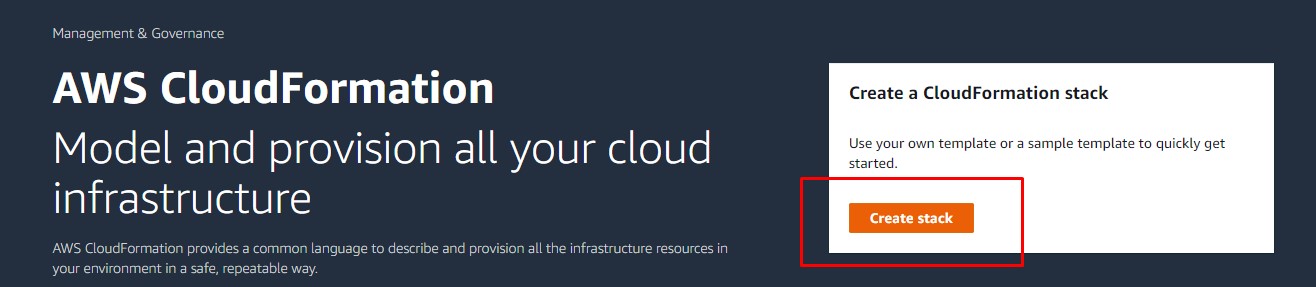
Let's view what that looks like in the console:
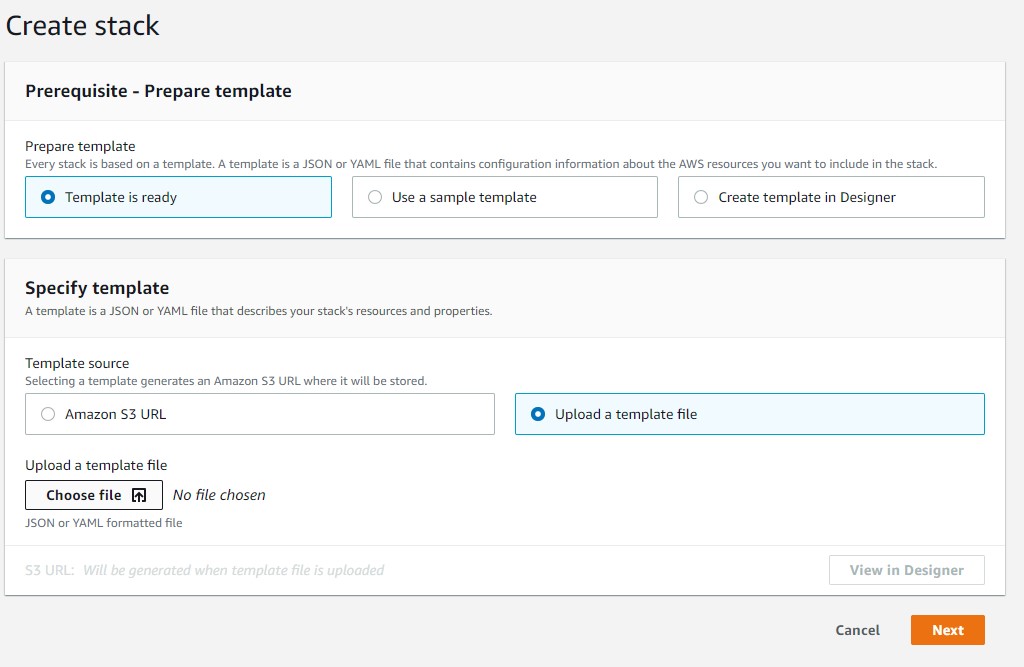
1) Navigate to CloudFormation and hit create stack:
2) Upload the CloudFormation template:
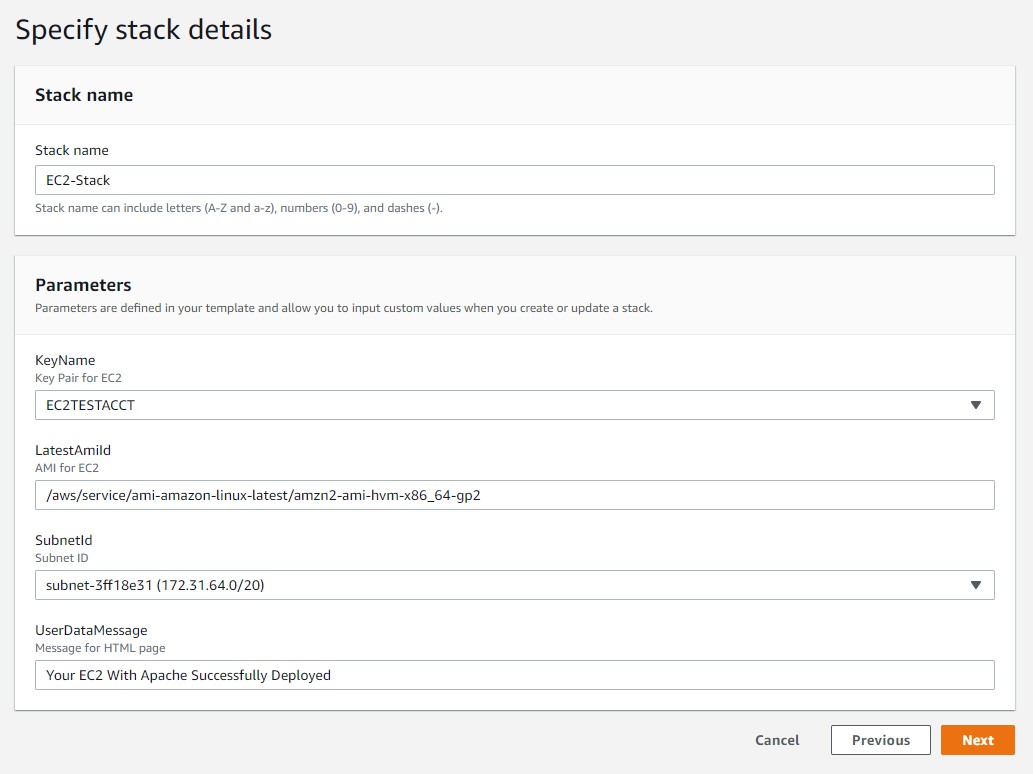
3) Set the parameter values:
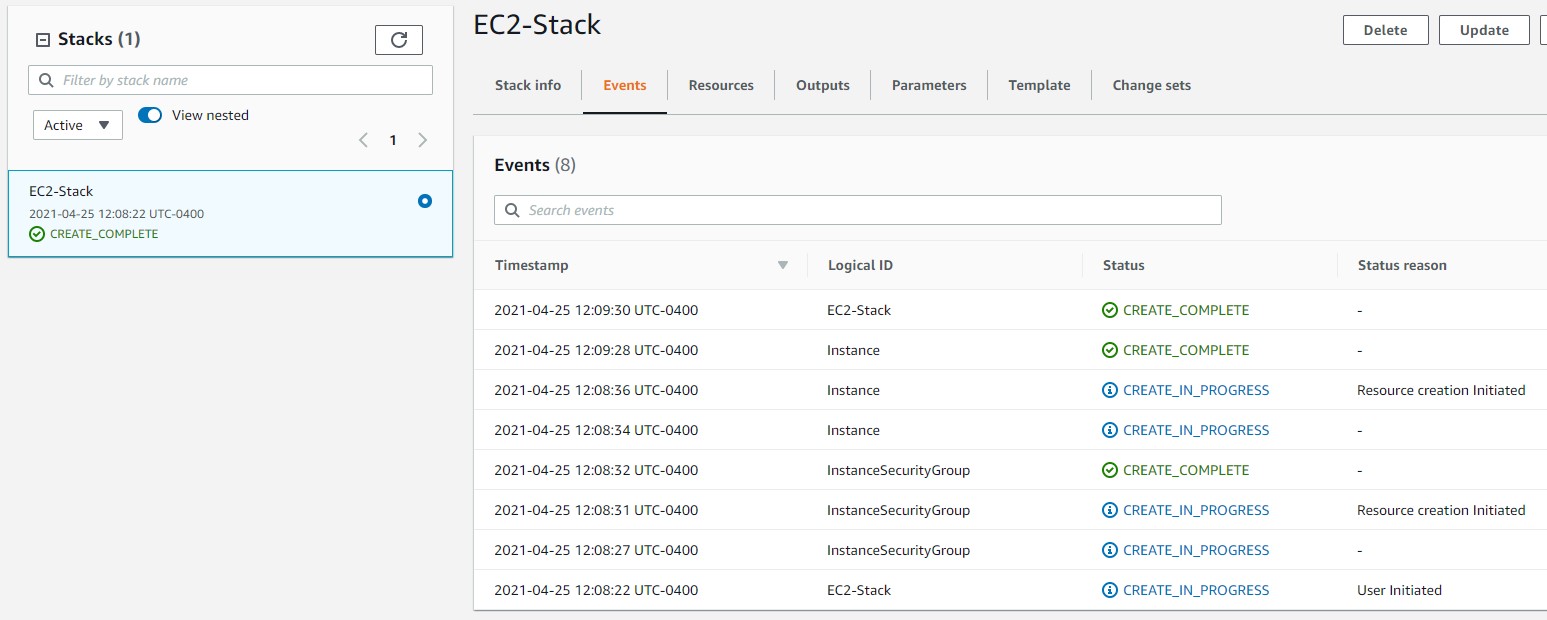
4) Monitor the events tab and allow the stack to finish creating:
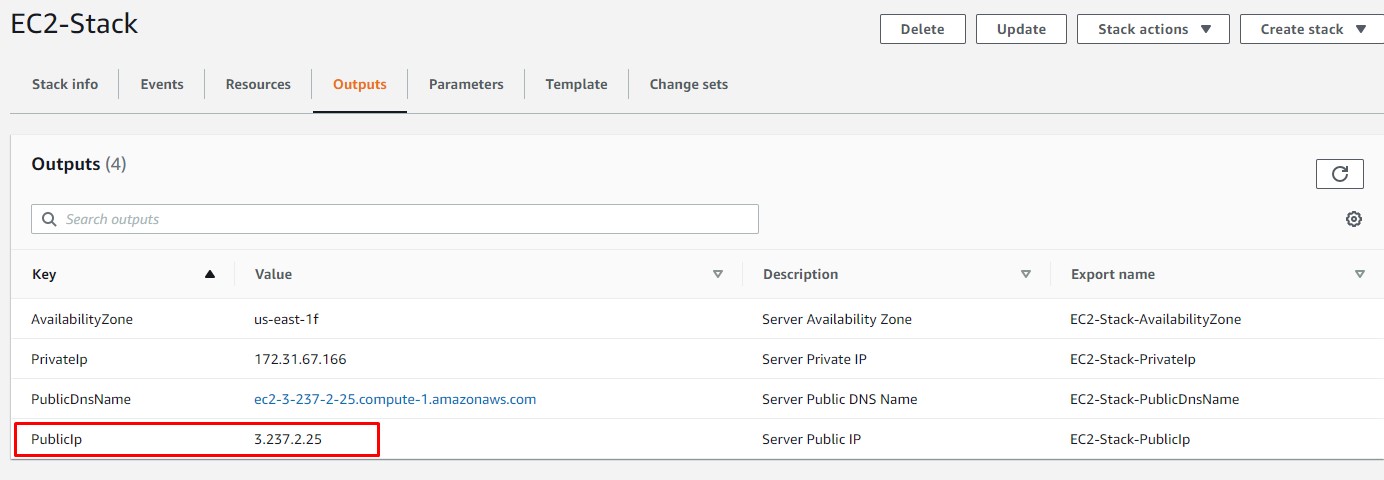
5) Get the public IP from the outputs section and confirm the site is active
a) Get the public IP of the EC2 instance from the outputs tab:
 b) Navigate to the public IP and confirm the site is active:

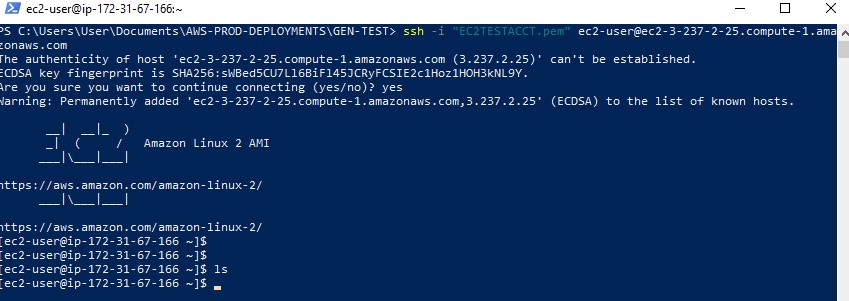
6) Test the SSH connectivity to the instance:
Confirm you can access the instance via SSH:
Conclusion
Our simple template deployed out 1 EC2 instance. With the power of CloudFormation we can deploy out a fleet of EC2 instances in a fraction of the time it takes to manually deploy them.
Thank you to everyone who made it to the end of this article!
Feel free to connect with me on LinkedIn!: https://www.linkedin.com/in/donovansearles/